Thanks for the update, I bet shops are busy this time of year.
Good job again by getting it on the ground safely.
Good job again by getting it on the ground safely.
Hah! Maybe so.More likely they're running a credit check on you to see how soakable you are....
")

Hopefully they will replace it with a rod end and bolt and nut like mine is in the above picture.Hah! Maybe so.
I did pop in to the shop today. I didn't get to see what it looked like before they started working on it, but they told me the connection broke at the ball joint where it connects at the carb, and that the cable itself was okay. I'm not familiar enough with that connection to visualize it, so I'll see what it looks like when they put it back together. (Maybe parts 26/27/28 on page 3B1 of the parts manual?)
All I saw at the shop was the bare end of the throttle cable and the bare carb throttle lever, with none of the connection hardware in-between.
I did see this on p. 2K24 of the maintenance manual:
View attachment 129984
I wonder what that felt like last Sept when it was in for annual?
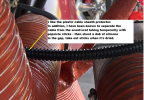
I do appreciate any critique of anything you see in my pictures. Always looking to do it better and safer.Nope. It's permanently swaged together. But if it's the same age as the other controls, you can get an idea of what's happening. Your carb heat cable:
View attachment 129872
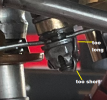
Looks like some roughness on the wire. Run a fingernail along it and see. Roughness is not good at all. At the end where it is clamped to the lever there's another place that can fail. Sometimes mechanics overtighten the nut on that drilled bolt, which is actually a Cessna part number and is called a clamp. This can partially shear the wire, and it eventually breaks there. We can get a better look at the idea on the mixture control:
View attachment 129873
The wire is bent (normal) but not sheared. You can also see some wear on the wire just ahead of the housing clamp. Push the mixture full rich and get a better look. Run your fingernail along it.
McFarlane sells a PMA'd mixture control that uses a larger wire, around .090". Great stuff, but now you have to drill that 1/4" clamp bolt to take the larger wire, and so there's a lot less metal in the bolt around the hole, meaning it can crack and eventually break with any overtightening. Compromises everywhere.

I have to ask, how in the world does failing to declare an emergency end up in an enforcement action?
Violation of 91.7(b)?
The pilot in command shall discontinue the flight when unairworthy mechanical, electrical, or structural conditions occur.
Below are some comments from a bored person. None are exciting/vital or criticisms.I do appreciate any critique of anything you see in my pictures.
I think you have a great attitude and I also try to abandon all ego when it comes to safety.Always looking to do it better and safer.
Your call. 2450 isn't bad, but I don't think I'd run them to the next overhaul.But my other 2 cables are oem and have 2450 hours on them. Didn’t replace them during the engine swap. So far so good?
Good catch on that uncompleted lockwiring job on the carb bowl drain plug.Below are some comments from a bored person. None are exciting/vital or criticisms.
I think you have a great attitude and I also try to abandon all ego when it comes to safety.
Below; comments on my comments most welcome.


Checkout this inspection list. Look at 18.Your call. 2450 isn't bad, but I don't think I'd run them to the next overhaul.


It was and you handled it brilliantly. Well done!Maybe it wasn't a "real emergency",
Better? Iast picture , sorry for the hi jack Jim_R.So they've lowered the bar to 1500 hours. Probably due to SDRs reporting failures close to TBO.
Um. This:
View attachment 130107
That bolt could work loose, quite a bit. The lockwire should wrap around the head of the bolt tightly, pulling it in the direction of bolt tightening. Like so:
View attachment 130108
I know it's just a baffle attachment, but what do the propeller bolt lockwires look like?

Last year's Install after retorque.
View attachment 130109
I dont know?Why did you use so fewer turns per inch on the top safety wire in the pic than the other two?


Like this?View attachment 130120
Better on the screw. But what's to stop that loop of wire through the starter lug from moving up the lug if the bolt decides to come loose? The wire should loop through the top of the hole, and the wire between the lug and screw should be tight. No curves to it.
Maybe I'm just too fussy.

It is.032! A couple years ago my AP/IA put the prop bolts safely wire in. He never said a thing to me about it.View attachment 130121
Maybe I'm wrong, but it looks like .032" lockwire. It should be .041". Service manuals sometimes specify what to use, but I don't see it in Cessna's manuals. Big hardware like that needs bigger wire. AC43.13 doesn't have a chart of hardware sizes to lockwire sizes, either.
Otherwise it's not bad at all. I liked to pull that wire tight so it sat flat on the bolt head hex flats. It looks like lubricant was used on those bolts? Only permissible if the manual calls for it. Otherwise, the bolt stretch vs, torque setting is messed up.
While we're on the subject of lockwire, turnbuckles are another place often screwed up. They should look like this:
View attachment 130123
Using lockwire as per:
View attachment 130124
Unless the aircraft manufacturer's service manual says otherwise, anything else is unacceptable. Sometimes I have found this:
View attachment 130125
That twisted end can snag on stuff and cause control difficulties. This is just plain laziness. Not acceptable at all. I found this type of lockwiring in a Maule, on the aileron cables above the headliner, and those twisted ends were snagging on another turnbuckle as the ailerons were moved. Dangerous. I've found it many other times as well, though not snagging. Yet.
You could see some of your lockwiring through the inspection panel under the left wing at the aileron pushrod. Should be two turnbuckles there, on the bellcrank. One at the right aileron. Three more on the control yoke assembly behind the instrument panel, maybe hidden by the plastic fascia panel.
Lockwiring turnbuckles is not a job for the impatient or foulmouthed. Working through small access holes with sharp edges can get you cut up and bruised pretty good.

 They got new washers.
That's it.Like this?View attachment 130126


That twisted wire needs to to wrap around the head some to provide a positive pull tro keep the bolt tight. Look at this as an example:Also, and this is just my opinion, it's best if you can keep any 'extra' wire from wrapping around the bolt head, where it could potentially slip off.


I'd have gone around to the far side with that wire. See how the twist isn't up against the hole in the bolt head? The wire can slip into the hole if the bolt turns to loosen. The bolt could make 1/8th of a turn before the wire would stop it.So, just to verify.. in this example, bolt on upper right is good.
Bolt at bottom, is good also, as it's straight enough to still provide the pull ?
View attachment 130144