Deice Valve troubleshooting

Tokirbymd

Pre-takeoff checklist
Joined
Oct 17, 2019
Messages
286
Display Name

Display name:
Tokirbymd
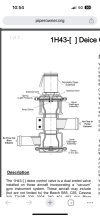
Have a problem with my deice boots (1994 Seneca IV). I think the deice valve on both sides isn't working and need help troubleshooting. I've pressurized the intake on the valve and actuated the solenoid (which "clunks" into position fine and shakes appropriately when shaken). But am still feeling a lot of air leaking I think past the diaphragm (inside the "cage" pictured below) and very little to no air from the outlet port. Is there a decent way to test this before I go spending $3k each for OH units (if they can even be found).1697166692319.png
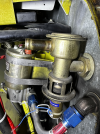
 
Is there a decent way to test this before I go spending $3k each for OH units
I'd first get a copy of the maintenance manual for your S/N aircraft and follow the enclosed ops checks, inspections, and troubleshooting charts or get some assistance in T/S'ing. While I don't know Piper systems well, the results you are getting in your test seem plausible especially since you appear to be bypassing the deice control system. Normally once a pneumatic system completes its brief cycle it dumps the pressure side to ambient. Which your test seems to be showing. Hopefully you didn't apply too much pressure at your test point as it is normally regulated. And just to add a common problem with pneumatic systems are dirty control valves which stick causing the control side not to function properly, ie., no boot inflation.
 
W
I'd first get a copy of the maintenance manual for your S/N aircraft and follow the enclosed ops checks, inspections, and troubleshooting charts or get some assistance in T/S'ing. While I don't know Piper systems well, the results you are getting in your test seem plausible especially since you appear to be bypassing the deice control system. Normally once a pneumatic system completes its brief cycle it dumps the pressure side to ambient. Which your test seems to be showing. Hopefully you didn't apply too much pressure at your test point as it is normally regulated. And just to add a common problem with pneumatic systems are dirty control valves which stick causing the control side not to function properly, ie., no boot inflation.
We have the service manuals and are following those. But their description for disassembly of the valve doesn’t match the design of the valve. And yes we have the correct part number per the parts manual. The service manual calls for removal of a poppet and hex pin. But the 1h43 design only has a solenoid and diaphragm
 
We have the service manuals and are following those.
Have you completed all the electrical checks?
Did it pass all the electrical tests?
And did those tests point to the control valve sticking?

When did you notice the deice did not function?
Have you performed an operational check per the manual?

But their description for disassembly of the valve doesn’t match the design of the valve.
How so?
Per the manual I have access to it states to unscrew the solenoid to access the poppet valve. In your picture it appears the valve solenoid has flats on it for I would assume its removal. Regardless, you may want to make sure the remaining system checks good and points to a valve problem before cleaning them.
 
Have you completed all the electrical checks?
Did it pass all the electrical tests?
And did those tests point to the control valve sticking?

When did you notice the deice did not function?
Have you performed an operational check per the manual?


How so?
Per the manual I have access to it states to unscrew the solenoid to access the poppet valve. In your picture it appears the valve solenoid has flats on it for I would assume its removal. Regardless, you may want to make sure the remaining system checks good and points to a valve problem before cleaning them.
So yes all electrical checks are good. We discovered the reason for the discrepancy between the manual and the part. The manual simply copy/pasted instructions from the original Seneca II which had a completely different deice valve part and design. While I don’t have one on hand I would assume it had a poppet and actuator pin design. The current part number merely relies on the solenoid to close off 2 small bypass holes thereby increasing pressure behind the diaphragm and forcing air into the outlet tube increasing boot pressure. The current valves appear to be leaking past the diaphragm so I suspect those are ruptured which will require replacement ($$$$ and unobtainable at the moment). However I want to bypass those and pressurize the rest of the system right now to fix any other faults before retesting and condemning the deice valve. Even overhauling mine will take weeks/months per tempest.
 
Have you completed all the electrical checks?
Did it pass all the electrical tests?
And did those tests point to the control valve sticking?

When did you notice the deice did not function?
Have you performed an operational check per the manual?


How so?
Per the manual I have access to it states to unscrew the solenoid to access the poppet valve. In your picture it appears the valve solenoid has flats on it for I would assume its removal. Regardless, you may want to make sure the remaining system checks good and points to a valve problem before cleaning them.
One question- on re reading the manual it appears you can leak test the deice valve by pressurizing the inlet to 18” psi and capping the outlet. 3”/min max leak rate. But this would be with solenoid deenergized I would assume. There isn’t a value for solenoid energized- I suspect this would be much longer. Currently with outlet plugged I get a lot of air leaking past the diaphragm so I suspect that is at least one of the issues.
 
While I don’t have one on hand I would assume it had a poppet and actuator pin design.
This is the part I still don't follow. In the Seneca IV MM I'm looking at and posted below, the solenoid must be removed to access the poppet valve. Have you removed the solenoid? You dont mention that above. If you did and you still have a different valve then I'd recommend call Piper support which is what I do in situations like this.
it appears you can leak test the deice valve by pressurizing the inlet to 18” psi and capping the outlet. 3”/min max leak rate.
But before you call, which valve are you referencing as the deice valve: the control valve or the deflate valve? From your picture it appears the control valve. If so that valve in a normal state is closed and bypasses deice pressure air from the pump overboard. It only opens to allow pressure air into the deice system during a deice cycle of 6 seconds or until 17 psi is reached then it closes again dumping pressure air overboard. So if I understand your post, with electrical power on, when you actuate the wing deice switch on the panel you have verified power at the control valve solenoids but neither control valves open and they continue to remain closed dumping pressure air overboard during the 6 second deice cycle?


1697285915838.png
 
This is the part I still don't follow. In the Seneca IV MM I'm looking at and posted below, the solenoid must be removed to access the poppet valve. Have you removed the solenoid? You dont mention that above. If you did and you still have a different valve then I'd recommend call Piper support which is what I do in situations like this.

But before you call, which valve are you referencing as the deice valve: the control valve or the deflate valve? From your picture it appears the control valve. If so that valve in a normal state is closed and bypasses deice pressure air from the pump overboard. It only opens to allow pressure air into the deice system during a deice cycle of 6 seconds or until 17 psi is reached then it closes again dumping pressure air overboard. So if I understand your post, with electrical power on, when you actuate the wing deice switch on the panel you have verified power at the control valve solenoids but neither control valves open and they continue to remain closed dumping pressure air overboard during the 6 second deice cycle?


View attachment 121411
Solenoid removed. There is no poppet valve there. And in a diagram of the actual part there is no poppet. Only an orifice for air to flow through and the solenoid actuates to close off the outlet holes in the solenoid forcing air against the diaphragm. And yes I am referencing the control valve although it is called a deice valve in the parts manual and by tempest. Part 1h43-20. The solenoid actuated with power applied by the switch and verified with the valve off the plane with a power source. But air doesn’t flow through the outlet valve.


This is a description of the function of the valve from the company.
 
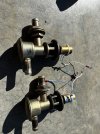
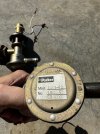
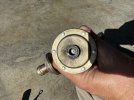
Pulled both control valves off the plane today to bench test. Solenoids unscrewed from the valve and work as advertised- no air flow through bypass holes when energized. Closed off the hole the solenoids screw into to simulate a closed solenoid (and also did this test with solenoid screwed in and energized as well) and with 20-40psi inflow (air pump produces 11.5psi) unable to get the diaphragm to close and get air coming out of the outflow port. Brought both valves home with intent to send off for OH/replacement. Decided to clean them in Hops#9/denatured alcohol just to see what happens. After a lot of cleaning and blowing air through all holes, was able to get it to function correctly with about 60-80psi into inflow port with solenoid port closed off (simulating solenoid closure). No leakage around diaphragm or rivets so those are intact. But still wouldn't work with lower psi that would typically come from an air/vacuum pump. I suspect the springs under the diaphragm are stuck, or similar mechanism is binding. May try soaking in rubber safe solvent to see if that will free things up before biting the bullet and sending for OH. 5D89CBC8-ADB8-450F-8305-ABB8BA6ADBB1_1_105_c.jpegC6070AF7-0484-464A-B988-FD71D2C7A5A7_1_105_c.jpeg5D162E62-8E79-4FA7-99A2-CF5F1C5D8C10_1_105_c.jpegD1D70B01-BBE4-4CD6-8F19-C92480E915E3_1_105_c.jpeg
 
Here is the final test- ended up with 1 new and 1 OH valve. This is the comparison bench test. Hope this description helps future aviators/mechanics troubleshooting.
 
Hope this description helps future aviators/mechanics
Always nice to see people try to fix things vs load the parts cannon. Just be mindfull of the Hops#9 with aircraft parts as it can be unforgiving in some instances and create a new problem. Good job.
 
Back
Top