C182 24V heated pitot - interchangeable with C172S?

Katamarino

Pattern Altitude
Joined
Dec 14, 2011
Messages
2,097
Location
YPJT
Display Name

Display name:
Katamarino
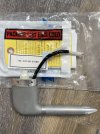
My heated pitot assembly, PN 0721105-18, has given up the ghost; corrosion inside the casting has led to the wires separating from the unit and it seems impossible to access and repair.

This specific part number is back-ordered with a 9+ month lead time. Someone has suggested using PN 0721105-12, which is for a C172S but seems identical.

Bit of a long shot but does anyone know if these are interchangeable?
2024-04-18 12.35.10.jpg

received_233949399777641.jpeg
 
Someone has suggested using PN 0721105-12, which is for a C172S but seems identical.
The way Cessna part numbers work, if they have the same core numbers (0721105) across different models the base part is technically the same. The dash number (-18 & -12) either signifies the different airframe model or signifies a modification to the base part. Where the parts are identical in form and function it will work across those models. However, this requires a mechanic that is willing to address this in a similar fashion as they are the one who accepts the substitution legally. I've used this method for years with airframe parts like doors and sheetmetal parts. That said, with some pitot tubes the heating element can be replaced however that also requires a mechanic who is willing and if you can find the correct replacement heating element.
 
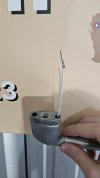
Looks like the parts in each assembly are identical with the exception of the body; the 182 body is -13, and the 172 body is -7. They look the same in the photos though!

Might see if anyone nearby has a 172 who'd let me borrow their pitot for a comparison.
 
Looking at your pictures, the top one has one wire, the bottom one has two.

They also dont seem to be compatible terminals, even if you did only use one of the two wires.
 
Should be able to replace the heating element. It's not a ton of fun, but doable. The nose unscrews, then the thin outer sleeve comes off and the ceramic element then pulls off. The most difficult part of the replacement is feeding the wires for the new element back up the body of the pitot. P/N 0721105-9 is the 24V element.
 
Looking at your pictures, the top one has one wire, the bottom one has two.

They also dont seem to be compatible terminals, even if you did only use one of the two wires.

That's because one of the wires from the top one had broken off.
 
Should be able to replace the heating element. It's not a ton of fun, but doable. The nose unscrews, then the thin outer sleeve comes off and the ceramic element then pulls off. The most difficult part of the replacement is feeding the wires for the new element back up the body of the pitot. P/N 0721105-9 is the 24V element.

This is exactly what my A&P and I figured out today; despite several shops saying they can't be serviced, they very much can. I have ordered a new heating element, and a new nose and tube just for the joy of it.

I did measure the pitot tube bodies on a few C172S and a C182T and all had identical dimensions, so I suspect they are in fact interchangeable.
 
Should be able to replace the heating element. It's not a ton of fun, but doable. The nose unscrews, then the thin outer sleeve comes off and the ceramic element then pulls off. The most difficult part of the replacement is feeding the wires for the new element back up the body of the pitot. P/N 0721105-9 is the 24V element.

Great tip!
 
This is exactly what my A&P and I figured out today; despite several shops saying they can't be serviced, they very much can. I have ordered a new heating element, and a new nose and tube just for the joy of it.
That’s a good plan, sometimes that nose piece is semi-corroded on there and hard to get off. When you already have a new nose piece you don’t have to be afraid of using channel locks or something marring to get it off, and then you can put the new one on with the proper spanner wrench.
 
That’s a good plan, sometimes that nose piece is semi-corroded on there and hard to get off. When you already have a new nose piece you don’t have to be afraid of using channel locks or something marring to get it off, and then you can put the new one on with the proper spanner wrench.

What exactly is the correct tool? We did get the old one off, but just by sticking a metal rod into the little hole in the side of the nose piece. I feel there has to be a better way, as when you apply any significant force this elongates the hole.
 
What exactly is the correct tool? We did get the old one off, but just by sticking a metal rod into the little hole in the side of the nose piece. I feel there has to be a better way, as when you apply any significant force this elongates the hole.
I’ve always used a small spanner wrench, the pin goes in that little hole and turns it nicely. With the threads cleaned up it usually goes together pretty easily.
 
I’ve always used a small spanner wrench, the pin goes in that little hole and turns it nicely. With the threads cleaned up it usually goes together pretty easily.
I'd never heard of one of those. Thanks!
 
Back
Top