Little Star V Thrust Tug - Dewalt drill powered

Hang 4

En-Route
PoA Supporter
Joined
Aug 18, 2017
Messages
2,518
Display Name

Display name:
Hang 4
I have one of these and ended up modifying it quite to eliminate the Dewalt battery which I found not to hold a charge. I have no idea how many of these are in the wild, but I'd be willing to to a "how-to" post if there is interest. Basically mounted 2 12volt batteries to the tug and added scooter speed control, reversing switch and gutted the drill electronics to just have the motor drive the tug directly.

Let me know if there is interest and I'll post how it was done. The picture is a "before" version to show what I'm talking about, grabbed it off the web.
tug.jpeg
 
I'd love to see a how to do post on this . TY
 
I have two of those. It's a VThrust Tugger that was exclusively sold through Sporty's.

For a while the problem was that there were no current DEWALT drills that fit in the collar (it clamps on to where the "hammer drill" side handle would go). I was cornering the market on used Dewalt 987 drills (the latest one that fit) off ebay for a long time. However, DEWALT now puts out the 998 (with the lion 20V battery) that I just got for mine.
 
So here it is. I got the tug from Craigs list from a pilot that had lost his medical. The unit was in great shape, but the batteries were tired. I replaced them, but ran into two problems. 1. I had to be diligent to charge the extra one and 2. I only got one "push" from each charge. My hangar has a but of an upslope and it's a sliding door, so the plane could get hung up on the track.

Step one was to get a couple 12v batteries and gut one of the drill batteries to wire the new batteries directly to the drill. This worked for a few weeks until the drill speed control gave up. Got a replacement and that lasted for a similar short time. Too much current going through the trigger. That led to step two, which was to get an electronic speed control for a scooter and wire it directly to the drill motor. This required a couple extra steps. Needed a place to put the twist grip throttle, which was solved by welding a tube onto the side of the tug opposite existing handle. This also made the ergonomics a lot better vs using the drill handle as the second "handlebar". The second extra step was adding a switch to reverse the motor so you could go both forward and backwards as the drill switch was gone. The case for the old battery made a good place to drill a hole to mount the switch and contain the wires.

The final modification was to add a light to make hooking the tug to the plane at night easier. An LED light with a relay and another rocker switch on the drill battery solved that problem.

I can now go at least 10 or so pushes in and out without a charge. The batteries are wired in series for 24v and the drill motor seems to have no problem with a bit of over voltage vs the 18v it's designed for.

I tend to do projects like this quick and dirty to get to work, then neaten it up once I've got it all sorted out. I haven't done the neatening part yet so it looks a bit cobbled together. Having said that, it works great.

Hope someone finds this useful. The red box in front of the batteries is a charger. One foibleof this setup is you have to remember to turn off the key on the speed control or it will discharge the batteries if it sits for a week or two.
IMG_0801.jpegIMG_0795.jpeg
IMG_0800.jpeg
 
The problem is it looks like you killed all that made the VThrusts valuable to me. I got these because my wife can't handle the weight of the larger tugs. Yeah, I get like two flights on the 18XRP batteries (which are archaic). However, you can get the lion 20V to XRP adapter and I just got the new Dewalt 998 drill with the 20V battery that will fit into that handle without modification.
 
I might have gone that way if the 998 was available when I started. I don't find it anymore difficult to handle though. The battery weight is fairly centered over the CG and I move it on the rear roller wheels unless I'm going over the hangar door rails. The twist grip handle seems better to me than the drill handle.

The one thing it didn't fix is the "testicle punch" you get if you have a sudden stop while pushing it out to the plane.
 
Wow, great post. I thought I was the only one in the world who still had one of these. Great tug, but as others have said, DeWalt discontinued the drill AND the batteries. I tried the generic replacements (China) and they just didn't have the power to go over my hangar door floor rails. Has anyone found a new model drill that will fit the compression piece that snugs it in. I thought I had it with the DeWalt DCD999, but no luck. Just about to pull the trigger on either a MiniMax or the AeroTow T1. Over $2k, so hope someone has a solution. Thanks
 
The problem is it looks like you killed all that made the VThrusts valuable to me. I got these because my wife can't handle the weight of the larger tugs. Yeah, I get like two flights on the 18XRP batteries (which are archaic). However, you can get the lion 20V to XRP adapter and I just got the new Dewalt 998 drill with the 20V battery that will fit into that handle without modification.
Are you saying the DeWalt 998 fits okay? Wow if so, and thanks
 
So here it is. I got the tug from Craigs list from a pilot that had lost his medical. The unit was in great shape, but the batteries were tired. I replaced them, but ran into two problems. 1. I had to be diligent to charge the extra one and 2. I only got one "push" from each charge. My hangar has a but of an upslope and it's a sliding door, so the plane could get hung up on the track.

Step one was to get a couple 12v batteries and gut one of the drill batteries to wire the new batteries directly to the drill. This worked for a few weeks until the drill speed control gave up. Got a replacement and that lasted for a similar short time. Too much current going through the trigger. That led to step two, which was to get an electronic speed control for a scooter and wire it directly to the drill motor. This required a couple extra steps. Needed a place to put the twist grip throttle, which was solved by welding a tube onto the side of the tug opposite existing handle. This also made the ergonomics a lot better vs using the drill handle as the second "handlebar". The second extra step was adding a switch to reverse the motor so you could go both forward and backwards as the drill switch was gone. The case for the old battery made a good place to drill a hole to mount the switch and contain the wires.

The final modification was to add a light to make hooking the tug to the plane at night easier. An LED light with a relay and another rocker switch on the drill battery solved that problem.

I can now go at least 10 or so pushes in and out without a charge. The batteries are wired in series for 24v and the drill motor seems to have no problem with a bit of over voltage vs the 18v it's designed for.

I tend to do projects like this quick and dirty to get to work, then neaten it up once I've got it all sorted out. I haven't done the neatening part yet so it looks a bit cobbled together. Having said that, it works great.

Hope someone finds this useful. The red box in front of the batteries is a charger. One foibleof this setup is you have to remember to turn off the key on the speed control or it will discharge the batteries if it sits for a week or two.
View attachment 133267View attachment 133268
View attachment 133270
 
I have one of these and the same battery issue. It sounds like the 998 drill is an easy solution if it fits in the bracket. If not, I don't think I am as "handy" as you appear to be. You talked about a "cleaned up" version. Do you have that and maybe a parts list? I don't need the light. In the end, are you really just using 12v batteries and powering around the work out drill battery? Would love this before I spend $2 grand on a new tug. Thanks
 
I don't have the battery part number handy, but they are just small 12v batteries for smaller devices like a mobility scooter. The speed control was the magic to make it work. There are three "handy" things you need to do to make it work.
1. Have a platform to hold the batteries. I used some scrap plywood U-bolted to the frame above the wheels. I used some scraps to make a holder around the bottom of the batteries on the plywood to keep them from sliding around and then used some threaded rod to make a hold down to prevent the batteries from falling even if the unit tipped over.
2. Need to get a speed control as the trigger in the drill can't handle the current. This is what I ordered off of Amazon and it has worked well.
speed control
The instructions for it are lousy, but if you have google translate on your phone you can hold it over the sticker on the top that shows the wiring and you can see what to wire to what to make it all work. You'll need a relatively heavy gauge wire from the battery to the speed control and from the speed control to the drill motor. I used 12 gauge speaker wire that has worked fine. To make it 24v, make a small jumper wire that connects the + on one battery to the - on the other, then use the remaining two to connect to the speed control.
3. Eviscerate the drill. This was the trickiest part and making sure you have access to a spare one is good insurance. As you found out, you need the exact model for the collar to fit.
- Gut the battery pack and get a DPDT switch. This is how to switch the tug forward/reverse. Drill a hole in the battery pack and install the switch. Look inside the pack shell to make sure there's clearance for the switch as there are a lot of plastic bits that get in the way. This switch goes between the speed control and the drill motor.
- Open the drill and remove the trigger. Wire from the reversing switch directly to the motor. Be very careful to not let the guts of the drill fall out. The three speed transmission is a bear to reassemble. (Ask me how I know). Reassemble the drill and clamp it to the tug.
The last part was to weld a tube for the twist grip throttle. I went to a local welder who had some of the right tubing and welded it up for me. I used about 8" of tubing to make a handle for maneuvering the tug.

I think @flyingron suggestion of the newer drill that fits might be the hot set up. It uses a brushless motor which should have more power vs the older model's brushed motor and it has Lithium batteries that should work much better than the NiHM's in the older drill. It's not cheap, but it's turnkey so might be the easiest solution
Thanks. I just ordered a 998 from Amazon and hope it fits in the collar. Thanks for the explanation
 
The problem is it looks like you killed all that made the VThrusts valuable to me. I got these because my wife can't handle the weight of the larger tugs. Yeah, I get like two flights on the 18XRP batteries (which are archaic). However, you can get the lion 20V to XRP adapter and I just got the new Dewalt 998 drill with the 20V battery that will fit into that handle without modification.
I have two of those. It's a VThrust Tugger that was exclusively sold through Sporty's.

For a while the problem was that there were no current DEWALT drills that fit in the collar (it clamps on to where the "hammer drill" side handle would go). I was cornering the market on used Dewalt 987 drills (the latest one that fit) off ebay for a long time. However, DEWALT now puts out the 998 (with the lion 20V battery) that I just got for mine.
Question. I got mine used and no manual. Do you happen to recall what power setting they recommend on the drill. Amazon delivering the 998 today. Hope it fits.
 
It's not rocket science. On the 987 I usually use setting 2, but you can set it wherever makes it move at the speed you want to go. Just be sure to set it for "drill" mode rather than hammer or screwdriving.
 
Same as @flyingron. 2 for almost everything, use 1 if batteries are weak and need to get over a hangar track.
 
I might have gone that way if the 998 was available when I started. I don't find it anymore difficult to handle though. The battery weight is fairly centered over the CG and I move it on the rear roller wheels unless I'm going over the hangar door rails. The twist grip handle seems better to me than the drill handle.

The one thing it didn't fix is the "testicle punch" you get if you have a sudden stop while pushing it out to the plane.
It's not a bug, it's a feature.
 
I have two of those. It's a VThrust Tugger that was exclusively sold through Sporty's.

For a while the problem was that there were no current DEWALT drills that fit in the collar (it clamps on to where the "hammer drill" side handle would go). I was cornering the market on used Dewalt 987 drills (the latest one that fit) off ebay for a long time. However, DEWALT now puts out the 998 (with the lion 20V battery) that I just got for mine.
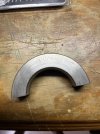
Well, bad news. I just got my 998 from Amazon and it doesn't fit the metal collar. Still too small. The collar for my tug has 1 11/16th stamped into it. I wonder if they put on different collars for different versions of drills they used.
Last step before a spend a couple grand on a new one is I'm going to go to a local machine shop and see if they can fashion a larger collar and weld it on.
Thanks for the help some of you have given me.
 

Attachments

  • Collar.JPG
    Collar.JPG
    80.1 KB · Views: 1
Any chance of just replacing the split collar with the right size to fit the replacement drill?
https://www.google.com/search?q=loc...0l3j0i22i30.5416j0j4&sourceid=chrome&ie=UTF-8
Like minds. Yea, that's my latest plan. I was going to take the tug to a local machine shop and see if he can remove the old collar and replace with a new one. I need to measure the metal collar on the new drill to make sure I order the right size. All the new DeWalt drill models seem to now have the larger handle collar, so am kinda stuck. Thanks for the idea and the link. I need an open collar that can be screwed together around the drill collar.
 
Back
Top