Thinking about a Bus/RV

Let me guess. You are going to put the Wankel in the bus.

Not for it's propulsive effect but just so it can be started and make a noise. I guess you would need a load for it to sound right.

The remaining question is, exhaust inside or outside? Inside, you would need a lot of ventilation but would get the full effect of the sound, outside just seems too sensible.
Wankel onboard generator swap!

Sweet 9000 rpm RV park sounds, all evening long.

ce0e91de-0411-4d8a-a464-788486e34108.jpg
 
I get the bus noise/sleep thing. In my 20s I used to do a regular 8 hr drive in an old Blazer with snow tires all around. I have no idea how I kept awake for all of those trips...and thinking back, I did nod off for a second or two on some trips, and I'm lucky. Road sounds = sleepy sounds. No kidding, I bet you could sell just the audio files.
 
I get the bus noise/sleep thing. In my 20s I used to do a regular 8 hr drive in an old Blazer with snow tires all around. I have no idea how I kept awake for all of those trips...and thinking back, I did nod off for a second or two on some trips, and I'm lucky. Road sounds = sleepy sounds. No kidding, I bet you could sell just the audio files.

That’s an interesting thought. Those videos get good views but aren’t very profitable on monetization because I turn off mid-video ads. Figure if the point is to have sleep sounds, having ads interrupt defeats the purpose and is rude.
 
For those who like reading the comments, my latest video on Super Singles has gotten pretty hilarious response. The things aren't popular among truckers. I'm sure it surprises nobody on here that something that's unpopular with the masses suits me well, and that most of the arguments against them I think tend to be due to improper use or arguments that don't hold water.

Anyway, it's been rather humorous to me, especially from the people who clearly didn't even watch the video prior to making a comment (which helps the YouTube algorithm in my favor, regardless of whether those comments are positive or negative). Not too many are hitting the thumbs down, though, as that ratio is still pretty high. And also humorously, it's doing remarkably well (for me) view wise. At over 5,500 views, it's quickly coming up on my #2 most viewed video in the past 365 days, with the #1 being my Prevost intro video I did last year. In another day or two it'll probably hit the #2 slot, and may even beat the Prevost video given another few months.

I do not understand the ways of the YouTube.

*break break*

The toilet, an electronic macerator unit, wasn't working properly. Although advertised as "new" (and looks new, maybe the bowl itself is) the controls seem to not be working correctly. I ordered a new control box, switch panel, and solenoid valve for the fresh water, as the issue I've been having is it not wanting to fill properly.

Now that I have an idea of how the system works, I'm thinking about the idea of adding a manual switch tin there that will let me both manually fill and empty the toilet at the same time. The reason for this would be to fill the black tank for cleaning purposes, rather than sitting there and pushing the "full" and "empty" buttons a whole bunch. However I can add that in anytime, so I may just wait on that for the moment.

Prevost sent me a reman air compressor, and literally did not package the thing at all. So, not surprisingly, it showed up damaged. They sent me another one which just arrived, hopefully that one looks a bit better.

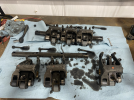
The other thing I've been needing to mess with but haven't fully decided what to do with is my exhaust rockers, the rollers of which have varying levels of pitting on them. That's something that if I need to wait until after my next trip, I can, but I'd like to get it fixed. I'll see what I can work out, but my air system is the bigger concern.
 
I do not understand the ways of the YouTube.

If you figure it out, let me know. Our oldest has been making YT videos for a couple of years. He's learned a lot about video capture and editing, etc., so we've let him run with it. He recently created a new channel dedicated solely to Fortnite videos (gotta give the people what they want!). For the most part he gets <1k views per video, but he's had a couple of vids that tripped some sort of algorithm trigger and pushed one of them up to 36k views and his latest one from last week is over 27k views. He's also captured over 1400 subscribers, so he's on the cusp of being able to be monetized (we're considering setting up a college fund for him to deposit his 32-cent checks. ha!). It's so weird seeing the views/subs numbers climb over the past few days. Luckily, he's actually geeking out on trying to figure out what the algorithm does and is crunching the viewer data profiles, etc., so he's learning something out of it. He said he's looking forward to getting a new analytics screen once he gets monetized. He might have some engi-nerd in him after all.
 
If you figure it out, let me know. Our oldest has been making YT videos for a couple of years. He's learned a lot about video capture and editing, etc., so we've let him run with it. He recently created a new channel dedicated solely to Fortnite videos (gotta give the people what they want!). For the most part he gets <1k views per video, but he's had a couple of vids that tripped some sort of algorithm trigger and pushed one of them up to 36k views and his latest one from last week is over 27k views. He's also captured over 1400 subscribers, so he's on the cusp of being able to be monetized (we're considering setting up a college fund for him to deposit his 32-cent checks. ha!). It's so weird seeing the views/subs numbers climb over the past few days. Luckily, he's actually geeking out on trying to figure out what the algorithm does and is crunching the viewer data profiles, etc., so he's learning something out of it. He said he's looking forward to getting a new analytics screen once he gets monetized. He might have some engi-nerd in him after all.

I'm not sure what the current thresholds are, but what's important is to sign up for monetization as soon as you hit that threshold. Once signed up then they don't revoke it (unless you do something against the rules) but I had a few days where I was right on the edge and it went back and forth because I missed hitting the "Submit" button while it was active.

I seem to recall that the subscriber base only needed to be 1,000 or so (and maybe not even that? I can't recall) but that you also needed to have 1,000 hours of watch time within some period, and that was what I had a hard time ticking over. My channel started getting monetized a bit over a year ago, so it both 1) may have changed since then 2) I may have forgotten the details since then. But I seem to recall that the watch time was what delayed it for me.

Unfortunately you don't get "back-paid" for anything you did pre-monetization. When I first started, my "goal" was to earn $1/day from monetization. What surprised me was that I was basically there once I got monetized. It's gone up from there. It's still nothing that impacts my life, but it's certainly not bad for a school age kid where it could either be a college fund, pay for his first car, something like that.

The analytics screen and what you get with that is really neat. I geek out on that quite a bit.

I think (based solely on what my 12 y/o has told me) is that it's currently 1k subscribers and 4k watch hours in the previous 365 days. He hit the subscribers target on Sunday I believe and he was thinking he would have the watch hours target overnight last night. I didn't talk to him before he left for school this morning to see if he made it.

It's definitely something fun to work towards and geek out on all the stats. ALMOST makes me wish I had paid more attention in my Marketing 101 class in college...... ALMOST, but not quite. ;)

Those numbers sound right. If I take a look, I'm currently at just over 11k watch hours for the past 365 days, and YouTube says that's ~150% more than the previous 365 days. What's also interesting is that my total views over the past 365 days (~150k) is only ~50% more than the previous. So I guess that tells me that my view "quality" (wathch hours per view) is ticking up, and I suppose that does track with what I've been casually observing.

Also, I should make one clarification. You don't get "back-paid" for views/revenue that would've occurred prior to your monetization. But, videos you made pre-monetization will start making money for you. For example, one of my more popular videos is one I made of a Cloud Nine flight in the MU-2. It's got over 24k views (for me that's a lot) and I put it up around 5 years ago. Once I hit monetization, it started making me money.
 
This week's video is about the engine data reader that I used in my last bus and in this one:

 
I finally made it by the Detroit dealer today, somewhat dreading what they were going to tell me the price was for a reman'd exhaust rocker with the updated ceramic roller.

The answer? Cheapest I'd found looking around. Barely more expensive than buying just the roller and a replacement pin from an aftermarket supplier.

Then when the parts guy asked if I had an account I said, "No, but what's it take to get one?"

Now I get shop pricing. Even better.

The new rockers should be here before the weekend, so I'll try to get those changed out and finish up that job.

I also in the evenings have been working on the black tank system, both the electric toilet issues and then also the electric black tank valve that's not been opening. Basically that black tank valve is stuck, and because it was stuck it burned out the electric motor. So I got the new valve and the electric motor is on its way. Hopefully that doesn't get too messy.
 
This week's video, on what's inside my old harmonic damper (and talking about torsional vibrations):

 
I completed the change of the rockers over the weekend on the bus. The job wasn't bad to do, other than the rocker assemblies being really heavy. But, it's a big semi engine, so the things are heavy.

Everything went together well and I've got them torqued down. I started doing the valve adjustment. The exhaust rockers I didn't check prior to removal so I have no idea where that adjustment was. However the intakes should be correct since those didn't change. So far I've checked half the cylinders and found one where they were dead on, one where they were less than half spec, and one with one really tight and one really loose. I'll see how the others fare, but I suspect those readings aren't much different from before I pulled things apart.

It'll be interesting to see if I notice an improvement in engine operation and mileage when it's all back together.

1716259429387.png
 
Last night I spent some time working on getting the air compressor off.

This is the kind of job that if you've done it more than once and you know everything you need, it's probably fairly quick. But honestly this is pretty annoying how it's done. Mainly the reason for this is that you've got a coolant return hose and an air supply hose which are conveniently located between the block and the air compressor, in other words inaccessible.

The "correct" way to do this would involve draining the coolant out, which I could do but I don't want to do at this point because the bus has green coolant in it (which is wrong - it should have extended life coolant) and changing that requires a proper flush. I don't want to do that right now. I also inconveniently forgot about the coolant aspect when I started disconnecting hoses and managed to spray coolant all over until I got some plugs.

The location of the air compressor isn't bad at all. But those connections are a pain. So I have to finish getting it unbolted and then get it off. Undoubtedly, I will also find some hoses or something else that need to get replaced as part of it once I get things apart.

I really don't like how this thing is set up. This seems like the kind of thing that would be much better served by some kind of redundant electric compressor rather than something that's continuously engine driven even if it's not needed. My tendency towards efficiency is angered. It wouldn't take much to get rid of this and replace it with an electric setup. But the hardest part with it would be that the fuel pump (which is mechanical, and it's a reasonable mechanically-driven item) is on the back of the compressor, which I guess is pretty normal on this style of engine. I also think it's probably not legal to run a vehicle of this sort without a mechanical air pump, which is another matter. And I have all the parts, so it's getting replaced.

Where was I? Oh right. This is big, heavy, annoying, and messy. I'll get it off, and then I will probably have to go buy some more hoses to replace.
 
How big is the cooling system that you wouldn't just fill up with water a few times and flush it out? Refill with Cat ELC or similar. 20 gallons?
 
How big is the cooling system that you wouldn't just fill up with water a few times and flush it out? Refill with Cat ELC or similar. 20 gallons?

20 gallons probably isn’t far off. The other issue is there’s coolant running elsewhere for heat purposes.

Just flushing it with water a few times then filling with Cat ELC was the plan, but given the size of the system I’ll need it parked outside and it’ll probably take a while. Maybe that’ll be a thing between summer trips.
Yeah, gotta get it up to temp and run the heaters wide open (and anything else that coolant runs through). I went so far as to run distilled water in my Excursion for a 3-flush cycle when converting from that Ford Gold coolant to the Rotella ELC (Cat-spec) when I put in a new radiator. Roughly 8 gallons on mine for each flush with two heater cores. I'd imagine yours has at least double the cooling capacity. After the first flush, I just let the rest of it drain out on the ground since the coolant concentration was minimal at that point. I was mainly trying to ensure any casting sand or debris was getting flushed out.
 
  • Like
Reactions: Ted
I managed to get the air compressor off, finally.

That was not fun.

The thing weighs about 55 lbs and you essentially have to awkwardly lift it to get it out of position, while also having hoses that must remain connected on the back side of the head and thus interfere. Oh, and there's a hose that also goes behind and must be removed first, and fittings. This really could be designed a lot better.

Detroit Diesel also put what look like cam and crank speed sensors behind it, which get in the way of two bolts that are basically impossible to get at. I am not enjoying this process at all.

However, the old compressor was passing oil and judging from the lack of resistance to turning definitely needed to be changed. So, it needed to be done.
 
Today and Monday I'm hoping to finish up both the overhead on the engine and the air compressor install. Yesterday, I took care of a crappy problem: the black tank valve.

For the most part, I love the Prevost and everything about it is better than the previous RV. But there are some things where you're buying a used pressurized piston twin in terms of complexity and thus maintenance. On the old RV, the black and the grey tanks had manual valves. You pulled them, they opened. You pushed them, they closed. Super simple, never gave me a problem at all.

The Prevost has electrically opening and closing black and grey tank valves. Kinda a nice luxury seeming feature, but something that I didn't want as extra complexity that's unneeded. After... I want to say the Christmas trip, the black tank valve wouldn't open. I managed to get it open enough that it would trickle drain, added another valve at the main outlet and left it at that. I'm not sure if that valve ever fully actually closed right when I had it.

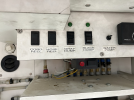
The way the bus is set up, the water/electric bay has switches for the black and grey dump. From the factory, these are 2-position toggle switches - open and closed. When flipped one direction, the motor moves that way until internal limiter switches stop it. If the limiter switches are broken or the unit doesn't move, it just keeps on trying and burns up the motor. As it turns out, one of my kids flushed a wet wipe (big no-no) and that got the valve stuck.

To make this more annoying, the new style, while better, uses 4 wires between the control box and the motor instead of 3. It's a momentary switch where the middle is off, and then either direction is open or close. Push one direction, it goes. The limiter switches will still stop the motor, and so will releasing your finger on the switch. Unfortunately, it doesn't bolt right back in. Maybe I can do a better job with it at another point, or more likely, one day I might redo the water bay as the wood in it was not waterproof and, while not terrible, has some degree of aging after 23 years.

1716728324816.png

Here you can see the new switch below the main switch panel. Yes, I will clean up the wiring, but that's what I needed to do for the moment.

The one benefit (that I didn't take a picture of) is that the electric valves allow that plumbing to be located underneath the retractable hose reel for supply water. Of course, that hose connection is now leaking since I had to disconnect it.

This bus also originally came with a retractable electric reel, something that got removed at some point. I'll have to find another one to add in someday, but for now it's "on the list."
 
I spent basically all day wrenching on the bus, and I managed to finish the overhead and install the new air compressor. I still have some details to finish up, but I got most of it complete.

I'm really particular on setting valve lash and if something is 0.001" off, I'll still adjust it to get it dead on. For cylinders 1, 2, and 3, this wasn't a big deal. But for 4, 5, and 6, which Prevost intended you to access from inside the bus, it was a pain. I'm glad I didn't have Jake brakes, that would've made this job impossible without the bedroom access. The intakes were off, about half were tight, 1/4 were on, and 1/4 were loose (although the loose ones were only 1-2 thou loose and the tight ones were more than 3 thou tight - go figure). Barring the engine over it has good compression, as you'd hope. And although not required, I replaced the valve cover gasket mostly for good measure since it was original and I figured it would leak if I didn't replace it. The valve cover is easy to get off except for the back bolt on the driver's side, which is basically inaccessible even with my long arms. Again, I could probably take more stuff of to get at it easier, but I hate doing that.

The air compressor is just a real pain. I could have removed the giant alternator located above it and that would have made the job easier I suspect, but I hate removing extra things on a job. It's just something we always tried to avoid at the shop. But the location of trying to lug in a 55 lb hunk of metal with hoses attached to it just really wasn't very ideal, and despite my French arms built to wave white flags, white flags seldom weigh 55 lbs.

Adding to the complexity is that the gear on the air compressor also has a coupling that drives the power steering pump on the front which needs to slide in at the same time, and the compressor doesn't mount fully vertically, so the gasket doesn't want to stay in position. I sold that one with a little RTV to hold it in place, and hopefully I didn't mess up the gasket on install and it will seal. I think I got it on, but it's just awkward. Maybe someone like @Jim K who's got semis is more used to it, and from what I've seen on big semis they tend to be located in maybe slightly less bad spots. And, of course, I've never done this before.

The good part is that today it's just putting details together (putting the fuel pump back on the back of the compressor, connecting the oil supply lines, reconnecting the crank sensor, putting on the turbo piping), blowing out some air lines, refilling the coolant (I lost a few gallons in the process) and then test run to make sure I didn't screw anything up. Really hoping I didn't screw anything up, especially the air compressor side.
I have Cummins motors so I just don't have to work on them :biggrin:

Seriously though, even my butterfly hood trucks have excellent access to work on the engine. On mine you can sit on the fender with your feet on the frame rail and have excellent access, be comfortable, and have a flat surface to lay tools on. I can't imagine trying to do it laying on the floor of my bedroom. The starter I had to do last fall in the middle of harvest though....that sucked. At least it quit in the yard and not on the road. Sucker is like 80 pounds. The new geared one was a lot easier to handle.

I find it interesting your air compressor is water cooled. My 855's compressors are just air/oil cooled.
 
I have Cummins motors so I just don't have to work on them :biggrin:

I look forward to hearing what happens when your valves have negative lash ;)

Seriously though, even my butterfly hood trucks have excellent access to work on the engine. On mine you can sit on the fender with your feet on the frame rail and have excellent access, be comfortable, and have a flat surface to lay tools on. I can't imagine trying to do it laying on the floor of my bedroom. The starter I had to do last fall in the middle of harvest though....that sucked. At least it quit in the yard and not on the road. Sucker is like 80 pounds. The new geared one was a lot easier to handle.

I find it interesting your air compressor is water cooled. My 855's compressors are just air/oil cooled.

That may be a change on newer models for improved reliability vs the old 855s. The access on this engine is orders of magnitude better than the old bus, but from what I’ve seen a semi still has better access. A lot of truck shops won’t work on busses and especially won’t work on RVs. I’ll put up a picture of the air compressor location.
 
Yesterday I got the details finished up on the bus and test ran it. Admittedly after the difficulty with getting the compressor in, and just having it apart for two things at once it was a little nerve-wracking to start it up. But the engine sounds healthy and the air built up quickly. And, for the first time, it seemed to behave more like air systems I'm used to. Got up to the "higher" pressure of 135 psi or so, purged and cut out, and then maintained something lower (around 110ish) just fine.

I drained the wet tank and it was, well, very wet and had a lot of junk in it. Another issue that had recently started was that the manual fill port for the air system was clogged and I couldn't fill the air port from there. This matters for a few reasons, but I figured that once I got the air system filling from the engine side it might work better. The fill port also has a drain on the bottom of it:

1716904701210.png

And after the engine was filled, when I opened that drain a good bit of oil came out, as well as some chunks that hit my finger noticeably. A few purges and fills and now it seems to be at least mostly working properly, I'll keep this going a few more tries.

I did a test drive on the bus and it was uneventful, exactly as hoped. I can't say if there is any more power or fuel economy from the overhead adjustment, I'll be able to tell that on my next trip. But the air compressor was definitely working well and properly.

I got home, finished up a few checks and went to go put the bus back in the shop when something bad happened.

As I backed in and over the hump to get in it's common for things to rock around a bit. And then there was a giant hissing sound like an obvious big air leak, coming from behind the refrigerator.

My first and immediate thought was that the fridge itself had popped a refrigerant line and was leaking all of its freon out, because surely there was no air line behind the refrigerator (why would there be one there, after all?) and so with much cursing I started tearing into the fridge, which to remove requires pulling off the doors. A new refrigerator would suck not just because we like this one and it was brand new when we bought the bus (put in at our request) but it also requires removing the windshield to put a fridge in.

And upon getting back there, I realized, there is, in fact an air line, and that was the problem. But the fridge, and specifically the people who put it in, were the cause:

1716907363037.png

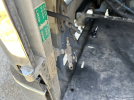
If you look where I'm pointing, that is right at a hole in that air line. The bottom is the supply air, and the top two are supposed to go to a pneumatically operated door (which doesn't work). Diagnostics indicate the solenoid itself is probably the issue as electronics for it seem to be working just fine. The Prevost group has indicated these valves fail.

But how did a hole end up in that air line when the bus rocked? This goes back to the refrigerator.

The installers put a piece of metal on the top for a support that was drilled into the wall:

1716907480361.png

What you don't see are the two sheetmetal screws that were in there. Two tiny sheetmetal screws for a whole refrigerator. And if you look at the first picture, you can see two distinct types of wood - a 1/4" plywood type where the hole is, and further below a proper thick piece of plywood. The fridge had slid out from its hole before, and that was where those screws ripped out. But they stayed in the metal, and then what clearly happened was that the fridge rocked, and one of those screws knocked that hole in the air line - something that was inevitably going to happen, and it's good that it happened here at home as opposed to on the road where it would be harder to deal with (albeit not impossible).

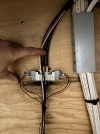
This is honestly really annoying to me because this is not something out of the ordinary for this shop that did the work, and they somehow thought that 2 tiny sheetmetal screws into 1/4" plywood was sufficient to hold a fridge in place. They also didn't think to relocate that air line which was poorly placed. However, I'm fixing the issue. First, I've added some scrap plywood that is thick enough that it will actually hold the fridge:

1716907675324.png

I'm relocating those air lines (that's not the permanent setup you see on the right), and I'll be drilling it in with 6 wood screws instead of 2 sheetmetal screws. Slap it and say "That's not going anywhere" and that's done.

And maybe I can replace that solenoid valve and fix my pneumatic door so that it now works.

There's always something to learn...
 
I've been mostly absent during the summer because we've been off doing things. It's been a busy summer - we were traveling for something around 5 weeks of it on two separate trips, covering something around 3-4,000 miles or so in that timeframe. The bus performed (mostly) flawlessly.

The first trip involved going to Colorado. This was the trip where we had an issue. About 50 miles east of Denver, the speedometer started acting up, eventually quit entirely, and the transmission wouldn't shift. It eventually went into limp mode. For those who are familiar with that part of Colorado on I-70, there's a whole lot of nothing out there, and it's far apart. We ended up making it to a relatively sketchy gas station parking lot off the highway where I'm pretty sure drug deals were happening overnight, but nobody bothered us.

The Prevost community is remarkably good, although as is often the case with these sorts of scenarios I got a list of all of the "common" things that go wrong, none of which ended up applying to me. A huge benefit of a bus like this is that Prevost publishes all of the wiring diagrams and maintenance manuals online, freely accessible. And, fortunately as well, we actually had cell signal and thus internet where we were. Unfortunately, I had forgotten to pack my multimeter, which ended up meaning I had to disconnect the Jeep and drive to the next town (which would've been a much better place to limp to since it not only had a NAPA but a KOA) and then buy a multimeter. So, now the bus has a multimeter and the shop has one too. Now I just have to remember to leave the bus one in the bus.

The problem ended up being a single connector with a single pin in it that connects the ground for the transmission computer. That pin was bent and the connector itself was melted. I honestly have no idea how that even ever worked in the first place - someone had obviously put it together wrong. But once I found it (which took hours of troubleshooting, diagnostics, and reading wiring diagrams) it was about a 30 second fix to delete the connector, crimp the wires together, and everything worked properly again. Overall for 50,000 miles of operating 20+ year old busses/RVs, we've had relatively few issues, and they've all (knock on wood) been easy to address so far.

I also learned some interesting things about the limp mode on the transmission. If the transmission stops receiving data it's supposed to and goes into limp mode, it will stay in whatever gear it's in until you pull the parking brake. At that point, it will stick in 2nd gear, non-lockup, and that's what you've got. I had to stop because I saw something in my rear view mirrors that looked like it required attention, and so after that stop then I was stuck in 2nd gear non-lockup. Normally on this transmission it hits lockup in 2nd gear and all other gears stay locked up, and so 50,000 lbs with a non-locked-up torque converter will generate a lot of heat. Without the transmission computer, you also have zero idea what your transmission temperature is, and burning up that transmission is something I want to avoid, which is why I didn't keep on limping. Once you then shut off the bus, the transmission will not go into any gear and you're stuck where you are.

Before that trip, I had replaced the exhaust rockers and done an overhead adjustment. I had screwed up the valve cover gasket installation (access wasn't good and I have since learned a few tricks) and so there was a mess of oil behidn the bus that got on the Jeep. That got fixed before the second trip.

Our second trip involved going to Ohio for a race at the race track in Lexington, followed by West Virginia. In the mountains of West Virginia I started noticing the engine running warm, something that made absolutely no sense given the fact that this bus has a very good cooling system. I ended up finding the problem. Off of the crankshaft there are 3 V-belts that drive a gearbox which then drives the engine cooling fan and the AC compressor. One of those belts had snapped and so it was running on 2. The 2 belts can run the fan, but not with the added horsepower demand of the AC compressor. And, those are large belts which are hard to find and I didn't have spares. The local parts store was able to get 2 in before we left our campsite in West Virginia, but not a 3rd. And the new belts were noticeably shorter than the shrunken (probably from slipping/heating) belts. So I disconnected the engine-driven AC compressor clutch such that it couldn't turn on (it will turn on under engine braking even if you've got the AC turned off) and we went home that way. No issues, other than it really does need that extra AC up front driving down the road in the summer with the sun in your face, so I was a bit warm. But we had one stint where we ran the generator for 5 days straight, and another where it ran for 3 days straight, and it performed flawlessly. One interesting note is that the generator has alwasy felt like it was vibrating more than it should. Once it had been running for a while, it was definitely quieter and the vibration went away. I'm wondering if it may have had a partly clogged injector that freed up after a long, harder run like that (it was hot and we had all 3 ACs going full blast for most of the time).

I can say with confidence that the fuel economy has gone up after the overhead, which isn't surprising. There were several valves that were off by a decent bit, although nothing that was truly concerning.

Now that we're back home, I'm going through some lower priority/clean-up items that I've wanted to do but haven't had a chance to. To start off, although the generator is now a bit quieter than it was, the amount I want to hear a generator is zero. Additionally, one issue that this thing has always had is that the passageway that provides air to the engine has openings without any kind of mesh or covering on them that bugs could easily get into, or even small birds for making a nest. That passageway was also just plywood, which reverberated sounds a lot, and it lets out on the passenger side of the bus, which is where you normally have your picnic table or things like that. So, I added some mesh wire to prevent stuff from getting in, and then I also added some sound absorbing foam to the passageway which should help to reduce the noise. I didn't put any kind of Dynamat or the like down first, and now am somewhat wondering if I should have, but hopefully this will make an incremental improvement.

The exterior lighting needed improvement in some areas. One is that this bus (along with a lot of other higher end coaches) have exterior "docking/cornering" lights which turn on to illuminate the areas on either side of the bus when turning or parking at night. This is really nice on dark, unlit roads. The factory lights are standard sealed beam enclosures. These days, there are LED units that are much brighter. I put those in, the difference is immediately hugely noticeable.

The rear lights were another item. The 3rd brake light (which is LED) had a coule of burned out LEDs. Ordered a new one and replaced that.

The rest of the rear lights are 1156 bulbs, a total of 20 of them. Yes, 20. And this thing seems to eat the bulbs. I decided to try to find some LEDs for at least some of the lights that would help. About a year ago a company had sent me some LED headlight buls for my Ram to try out, and I've been impressed with them. So I ordered some more from the same brand, which so far I'm happy with. At this point I haven't changed out all the bulbs, but I will probably change them all out with time as they burn out. For those who're interested, this is what I used:


Make sure you order them for the correct color of your lens to get the maximum output.

The next area that needed attention was the forward lighting. I have never been happy with this, and when you're driving a bus that weighs 50,000 lbs at night on dark empty roads, lots of forward visibility is nice. The people I bought the bus from had installed the nice and expensive LED headlight upgrade, and then proceeded to completely screw up the aim and wiring on it. I got those aimed better now, but the driving lights were basically useless. Upon investigation, this was an annoying thing, the people I bought it from had installed... literally $17 Amazon lED driving lights. No wonder they're terrible. I removed them and am going to repurpose them in the back of the bus to add in some more engine bay lighting.

I ended up deciding to go with a two-pronged approach. I added in some new driving lights in the same area, and then also added in a light bar as there's a spot where I could fit a 30" one nicely. Based on the intial checks, this setup is very bring, looks to be well focused light at that, and I think will improve my night driving significantly.

With my box of parts from Prevost, I also had ordered a new belt tensioner for the big 8-rib engine belt which drives the 500A (at 24V!) alternator and the water pump. During some previous work, I'd noticed that the tensioner had felt a little crunchy when removing the belt. Sure enough, upon removing it it was obvious that it was falling apart. Good preventative maintenance. That belt looks just fine, so I left it be.

There are a few new videos about work I've done on my YouTube channel for those who are interested.
 
Our second trip involved going to Ohio for a race at the race track in Lexington, followed by West Virginia.
A race track in West Virginia.??

You wouldn't know the name of the track would you.??
 
A race track in West Virginia.??

You wouldn't know the name of the track would you.??

Race track was in. Ohio. West Virginia was New River Gorge national park.
 
Race track was in. Ohio. West Virginia was New River Gorge national park.
Ahhh... got it, I flight instructed at Ona Airpark, near Milton, WV which was a privately owned airport that also had a 3/8 mile paved circle track on the property.

I did several flights over the New River Gorge Bridge while flying fire patrol. Too bad you missed 5 dollar Frank. A real character, I met him a few times and he was something else.


Race track was in. Ohio. West Virginia was New River Gorge national park.

Did you do the Bridge area, the middle part, or the south end? We were there in May visiting my FIL who lives on the Greenbrier River near it’s mouth to the New River.

We visited the bridge area, drove the old river crossing with the audio tour, and hit the middle area to hoke around Grandview.

Beautiful area.

We did the bridge area, and did the bridge catwalk. It was a lot of fun, we also did some white water rafting.
 
We did the bridge area, and did the bridge catwalk. It was a lot of fun, we also did some white water rafting.

I wanted to do the catwalk but my FIL wasn’t up to it. We walked over to the gate area and watched a tour go out there though.

Then, the old river crossing tour has you cross underneath where y’all walked out on the catwalk. The support columns down there are massive when you get up close to them.

Next time we go out we’ll do a raft; the weather this past May wasn’t really conducive to it.

Glad you enjoyed it.
 
With 6Y9 coming up, it's time to finish up the little items on the bus, or at least get things back together before going.

One of the items to do was greasing up all the zerk fittings. This is due every 5000 miles, and while there aren't a ton of zerk fittings, there's a good number and this goes through a lot of grease. Enough such that I ran out and had to buy more. So while finishing greasing the driveshaft (it takes a lot of grease), I had the air system filled, and heard a slight hiss of leaking air - sure enough, one of the 17,000 air fittings is leaking. Fixing air leaks on this bus is a game of whack-a-mole. Air is used everywhere, for everything. And so what that means is there are a seemingly endless number of places where leaks can occur.

Why did I have the system aired up? To see if another leaking fitting I'd just replaced was fixed and no longer leaking. Like I said, whack-a-mole.

I also did another flush and fill of the transmission. One of these days I should have the fluid mostly exchanged, but it still comes out smelling burned and noticeably darker. This thing holds a LOT of fluid.

A friend of mine gave me a battery shunt that he had used for his solar array but ended up not being a good fit for him. I added it to my battery bank so that I can keep track of how the batteries do. 6Y9 will be a good test for this since it will be an off-grid weekend and hopefully also cool enough that we won't need to run the AC (that's the norm, but last year was unseasonably warm). I'd like to see how things go with that, and start thinking about whether we want to expand the battery array or not. With 24V and 420aH (so figure 10kWh) it's got double what the old bus had, and effectively more because of lithium vs. lead acid, but the Prevost goes through more power.

This bus has a heat shielding blanket on the exhaust before it heads out of the engine bay towards the muffler. The original one was falling apart, so I bought another one to replace it and got that on.

There's more on the list - there always is - but these are good for this trip.
 
Random thought of the day - I'd rather take a ride in your bus than in either of the two current US spacecraft, let alone any from any other country.

Re the air leaks, it would be cool if it were possible to fill the air systems up with orange smoke and fix all the leaks at once. And if anyone working at a spacecraft company uses that idea, I expect a coupon for a steak dinner at my choice of eatery.
 
Back
Top