Cessna flap bearings maintenance tips wanted. Other maintenance related pictures.

Gary Ward

En-Route
PoA Supporter
Joined
Jan 16, 2020
Messages
2,711
Location
Cincinnati, Ohio
Display Name

Display name:
Challenger1
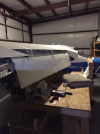
I want to remove the flaps to get to the roller bearings for cleaning, inspection and grease repack.
I looked at the service manual.
It seems like a job I may need a extra set of hands?
Any advise that you can offer?
TIA
 
Last edited:
I want to remove the flaps to get to the roller bearings for cleaning, inspection and grease repack.
I looked at the service manual.
It seems like a job I may need a extra set of hands?
Any advise that you can offer?
TIA
Some long hemotats for the bolts in the flaps, and a magnet on a string to fish out anything that may get dropped in there.

I take the aft rollers out first, just let the flap hang on the fwd ones. The pushrods could dent the skins so might disconnect those.

I think I taped it just to keep it from flopping around. I scrubbed the tracks and stuff for a few hours using mineral sprits and ACF-50.

Not a big deal. All done with no toes, one hand and a hook.

1702042862785.png
 
Last edited:
Could take a long ziptie and maybe wedge it into the aft rollers to prevent them from falling out of the track when the bolts are out or trying to get the bolts back in them.
 
Note there is a plug you can remove on one end to enable loosening nuts

with a long extension.
 
Note there is a plug you can remove on one end to enable loosening nuts

with a long extension.
The OP has a 172. There are little inspection covers on each side of the aft flap roller bolts.

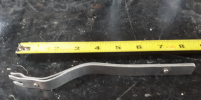
First thing is to make the right tool. Saves much frustration and damage. Grab some .063" aluminum, 5052 in some temper will do, and cut strips 5/8" or 3/4" wide. Drill a hole in one end of one piece, 7/32" diameter, and saw a slot from the end to it. Form it like so, and rivet another piece onto it, with the shape as shown. The bolts are AN3s, so shape the whole thing so that the bolt head is trapped firmly in the end of the tool. The tool is bent with an offset to get at the bolt, and also to allow the bolt to be reinstalled.

1702080912627.png

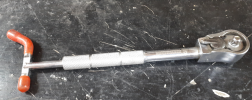
The other tool that is handy is this one:

1702080992847.png
It's a 1/4" drive ratchet and acts like one, but that red handle on the end drives a shaft up the center of the handle so that the socket can be turned with no handle movement. Good for getting the nuts off the bolts and on again. I think I bought it from Wicks maybe 20 years ago. Use another 1/4" ratchet or flex bar to hold a 3/8" deep socket to keep the bolt head from turning.

The rollers should be greased with Aeroshell 22 (I think it's now 33). Those rollers are Torrington bearings with a hard steel sleeve pressed over them, and that sleeve can gradually walk sideways and it starts cutting a disc out of the flap arm. If that disc rips out in flight, the flap will cock and jam and tear up the tracks and wing structure. Nasty mess. Best to buy all-new roller kits from McFarlane, which come with shorter rollers and stainless washers to fit on either side of the rollers so that the arms can't get scored. Take this problem seriously. Take the flaps right off for a good look.
https://media.mcfarlaneaviation.com/documents/doc-seb95-3.pdf
Another article:
https://www.cessnaflyer.org/magazin...essna-flap-tracks-inspection-replacement.html

Unless you're experienced, it's a two-man job. I've done it alone numerous times, but you sure scramble around a lot. And you use a lot of tools to try to get those rollers in the right spot to stick the bolt through, and without that tool I made, it's nearly hopeless doing it alone. Pliers or forceps let the bolt twist around, or it pops out and sure enough will fall through a lightening hole in the flap spar and go to some dark corner.
 
The OP has a 172. There are little inspection covers on each side of the aft flap roller bolts.

First thing is to make the right tool. Saves much frustration and damage. Grab some .063" aluminum, 5052 in some temper will do, and cut strips 5/8" or 3/4" wide. Drill a hole in one end of one piece, 7/32" diameter, and saw a slot from the end to it. Form it like so, and rivet another piece onto it, with the shape as shown. The bolts are AN3s, so shape the whole thing so that the bolt head is trapped firmly in the end of the tool. The tool is bent with an offset to get at the bolt, and also to allow the bolt to be reinstalled.

View attachment 123123

The other tool that is handy is this one:

View attachment 123124
It's a 1/4" drive ratchet and acts like one, but that red handle on the end drives a shaft up the center of the handle so that the socket can be turned with no handle movement. Good for getting the nuts off the bolts and on again. I think I bought it from Wicks maybe 20 years ago. Use another 1/4" ratchet or flex bar to hold a 3/8" deep socket to keep the bolt head from turning.

The rollers should be greased with Aeroshell 22 (I think it's now 33). Those rollers are Torrington bearings with a hard steel sleeve pressed over them, and that sleeve can gradually walk sideways and it starts cutting a disc out of the flap arm. If that disc rips out in flight, the flap will cock and jam and tear up the tracks and wing structure. Nasty mess. Best to buy all-new roller kits from McFarlane, which come with shorter rollers and stainless washers to fit on either side of the rollers so that the arms can't get scored. Take this problem seriously. Take the flaps right off for a good look.
https://media.mcfarlaneaviation.com/documents/doc-seb95-3.pdf
Another article:
https://www.cessnaflyer.org/magazin...essna-flap-tracks-inspection-replacement.html

Unless you're experienced, it's a two-man job. I've done it alone numerous times, but you sure scramble around a lot. And you use a lot of tools to try to get those rollers in the right spot to stick the bolt through, and without that tool I made, it's nearly hopeless doing it alone. Pliers or forceps let the bolt twist around, or it pops out and sure enough will fall through a lightening hole in the flap spar and go to some dark corner.
Awesome information and expertise. Thank you so much Dan. Exactly what I was looking for and from the member I was hoping would share his expertise. We are lucky to have you here. Thanks again!
I will keep you informed as to the outcome.
I was going to remove first and inspect, but I think I will order the new rollers $$ with the stainless washers and the grease to make it as good as it can be. Well maybe not the grease since the new rollers should be greased? Aware of SEB 95-3 but have not received a copy of it yet from McFarlane.thanks for including it in your post.
It looked like a tricky job to me?
Thanks to everyone for your help.
 
Last edited:
Aware of SEB 95-3 but have not received a copy of it yet from McFarlane.thanks for including it in your post.
It looked like a tricky job to me?
I found the damage on a 150's flaps to be deep enough to dress out. Measuring the depth to see that it's not more than .020" can be done with a little piece of .020" lockwire. Use a micrometer or good vernier or digital caliper to measure its thickness first, then form it into a little curve to fit into the groove in the flap support arm. Measure the total thickness of the arm, from the outside of the arm to the lockwire on the inside, and deduct the lockwire's thickness from the arm's thickness to get the thickness at the bottom of the groove, which should be less than .020" less than the undamaged thickness of the arm. Remove the paint from the area where you're measuring or the depth will read too high.

Too many words to describe a simple process, but I'm only on my second cup of coffee.

I buffed the damage out using a stick about 38" thick and a half-inch wide, rounded at one end with a strip of aluminum oxide cloth stapled to the wide sides and stretched over that curved end. That lets you get between the arms and carefully grind away at the damage. The Service Bulletin calls for emery cloth, which is really a poor thing, since emery can contain iron particles that will embed in the aluminum and encourage corrosion. From Page 6-26 of AC43.13-1B:
1702141844536.png

The emery is black. Aluminum oxide is brown. Both are on cloth.

The new rollers should be pre-greased, but it's good to have the Aeroshell on hand anyway, as it's the MIL-Spec for the nosegear stuff. Cessna calls for MIL-PRF-81322, which is the Aeroshell 22. The manuals don't talk about flap roller lube, as far as I can find, but that grease is specified as a general-purpose grease for the airplane.
 
More great info, thanks! ^^^^

This is what I have been working on last 2 nights. Getting these steering rods in and out is a major chore.. New steering boots also to keep the cold air out this winter. My old boots were only 5 years old but did not last. These are the hi dollar Kevlar.
(edited)_IMG_3649_-_Copy.png
Finished it last night.The boots are sealed to the fuselage with hi temp silicone sealer.
Airbox repair next and the flaps after I make the tool you showed.
IMG_3658.HEIC

IMG_3656.HEIC

IMG_3654.HEIC
 
Last edited:
Regarding the flap hardware, I see McFarlane mentioned - you do have their upgrade flap roller kit? If not, now would be a good time to install it.
 
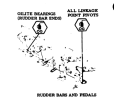
Some stuff to inspect while the rudder bar covers are off:

Brake hoses. Hardened or leaking?

Rudder bar pivot blocks. They are bolted to flanged ribs in the belly and the ribs crack at their bends next to the blocks.

The brackets that hold the bottom of the master cylinders tend to work loose. If one falls off you have no brake on that side, and the pedal flops around.

The pedals pivot on a tube that runs through the top of the rudder bar posts. The hole in the aluminum pedal gets worn all oblong. New pedals are available from McFarlane.

The brakes are controlled from the copilot's side via torque tubes that run inside the rudder bar tubes. There are bellcranks on each end of both of those tubes, held by AN3 bolts. The bolts wallow out the holes in both the bellcrank and cross tube.

Much of this sort of thing is limited to higher-time airplanes.

Those steering bungee boots keep out the cold, but they also keep out carbon monoxide from leaking exhaust joints, since the cooling air exhausts past those bungees. They also have to try to keep flame off your feet in the event of an engine fire.

While the cowling is off, look at the firewall next to the cowl shockmounts that hold the top of the bottom cowl. The stainless tends to crack right there.
 
Brake hoses get replaced?

Rudder Pedals get lubed?

Do these EVER get done?


These are best addressed when planned. Waiting till there is an issue

”somewhere” makes for a far bigger ta$k!
 
Gary, I bet it’s only an optics thing that makes your gascolator safety wire have the appearance of being slack! Darn phone cameras.
 
1702252628227.png

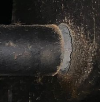
Hard to see if there's wear there. The side that the brake cylinder in on gets it the worst, as the pedal gets torqued against the pin on that side when the brakes are applied. You can grab the pedal and try to rock it left-right.
 
View attachment 123163

Hard to see if there's wear there. The side that the brake cylinder in on gets it the worst, as the pedal gets torqued against the pin on that side when the brakes are applied. You can grab the pedal and try to rock it left-right.
I will check that as the cover is still off. What would you lube that with? TIA
 
The Pilot ( Master cylinder ) side wears more rapidly than the CP side.

Usually there is little evidence of EVER being lubed.

It‘s somewhat awkward to do this . The covers make no difference .

Swapping the pedal from one side to the other may be an option.
 
I will check that as the cover is still off. What would you lube that with? TIA
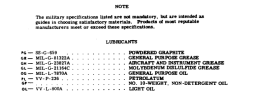
From the 172 manuals:

1702313171635.png

1702313200710.png
So, the manual says MIL-L-7870 oil. That spec has been upgraded, but the 7870 is the critical number. Royco 363 is one example.
https://www.aircraftspruce.com/catalog/eppages/royco363.php?clickkey=92316

That's a gallon. You can get it in quarts elsewhere, and a quart of it will last you a lifetime. The places it goes take only a drop or two, maybe once a year. It's good stuff and doesn't dry out like LPS or any of those other squirt-on lubes that mostly make a mess.

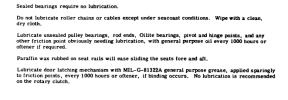
I didn't often bother lubing those pedal pivots, though. It's a dusty, dirty spot, stuff falling off your shoes, and oil attracts dust and can make things worse. Dry graphite might be better. I have used paraffin wax in spots where dust and dirt are a problem, but you'd have to take stuff apart to get it in there. Paraffin works well on the door latch plunger; just open the door, turn the latch handle to closed, and rub it on the plunger. Hardware stores will sometimes have paraffin. It's commonly used in home canning, too. A block of it will last a very long time.

From the manual again:

1702313925893.png
I've used the paraffin on the seat rails to good effect. Break a small chunk of it so that you can rub the underside and edges of the rail, where the roller cage tends to gall the aluminum. Don't rub it on the top of the rail, and don't use it on the rollers or their bushings. The seat rail AD forbids any lubing of the rollers, as it gunks them up and seizes them. Note that they recommend greasing the door latch stuff; that's ok for the internal stuff, but not that plunger. It will get gunked up. And it will get on your clothes, too.
 
Did your mechanic indicate the flap bearings needed attention? If so, why didn't he address them at the last annual? If not, I presume he lubricated them and signed it off. What's the gain in effing with them now? Is he going to sign off your work? Have you asked him for his advice?
 
Did your mechanic indicate the flap bearings needed attention? If so, why didn't he address them at the last annual? If not, I presume he lubricated them and signed it off. What's the gain in effing with them now? Is he going to sign off your work? Have you asked him for his advice?
How do you lubricate them?
It is my decision to remove them so they can be properly inspected and lubricated.
When I go to the trouble to remove them I will update them to McFarlane rollers.
And yes my AP signs off my work.
Reason I want to give them attention is because one side chattered when coming down one time during pre flight and that made me think I better look closer.
In the past I sprayed them with spray lubricants but learned that is not the best way to lube them as you want the tracks dry and the outside of the roller dry so they roll and not slide in the tracks so not to wear them out.
And so how do you lube them? I am looking for tips to maintain them.
 
Every annual I’ve seen done on a Cessna included inspecting rollers and tracks, then lubrication with CRC or LPS and wiping off residue with a rag. If they ain’t broke, don’t fix them. You’re likely to do more harm than good.
 
It is my decision to remove them so they can be properly inspected and lubricated.
Yup. One can drip oil on their ends, but when they're full of old, hardened grease it makes little difference.

This stuff gets ignored at annuals because it takes so much expensive shop time to do it right, and many owners hold to the old (and faulty) philosophy that "if it ain't broke, don't fix it." That's why we regularly see stories here of failed alternators and magnetos and vacuum pumps; they were left alone because they weren't broke. So they broke in flight, making things much more interesting than most of us like. Sometimes it can get instantly dangerous, like flap cables that break in flight and let one flap bang up so the other tries to roll the airplane over real hard. Cables that weren't checked along their lengths for a very long time, and were chafing on fairleads ort stuck pulleys, or were corroded. A friend had such a flap failure in a 185 on floats. It didn't end all that well; they were just off the water, and the airplane dove in. He and his one passenger got out OK and swam to shore.
 
Every annual I’ve seen done on a Cessna included inspecting rollers and tracks, then lubrication with CRC or LPS and wiping off residue with a rag. If they ain’t broke, don’t fix them. You’re likely to do more harm than good.
Like I've said before, that isn't good maintenance, and is the reason we don't find it in Cessna manuals. CRC and LPS will both dry to a waxy sludge far sooner than the MIL-spec oils or greases. I've seen it, had to scrape layers of it off flap arms and tracks, and if it does manage to get into the rollers, it waxes up the tiny needle bearings in there. Seized rollers. Mechanics also spray that stuff on the flap actuator jackscrew threads and foul the screw and ball-nut all up, too. Older airplanes used a moly grease; later models, and those that had updated actuators per a Service Bulletin in the late 1960s, called for #10 non-paraffinic oil, but older mechanics persisted in using the grease, which really messed up the recirculating-ball nut, or squirting the LPS over the screw. Both methods result in oil and grease getting into the flap limit microswitches, fouling their contacts so that at a bad time (of course) the flaps refuse to retract. Think an overshoot with full flaps in a heavily-loaded airplane on a warm day. People get hurt because mechanics did their own thing instead of using the valuable advice in the book, which says to put some of that oil on a clean rag and wipe it on the threads. Just a film. Anything more is a waste that doesn't help lubricate those balls, and can cause inflight failures.
 
I learned so much here in the last few years on how to take care of my aircraft. It is very valuable and I thank everyone here who helps.
I can’t afford to have my AP do everything for me. He has known me for years before the plane and helps trust me.
He has taken care of this plane since 1990. It did not fly much before I bought it. 1400 hours in 40 years
I have flown it 1000 engine tach hours in 5 years and over 2600 landings. My flaps get used a lot.
 
Last edited:
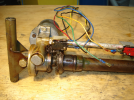
This a flap actuator I took out of a Cessna R172K (Hawk XP). It is typical of mechanics who do their own thing.

1702323475058.png
The mechanics had been using the moly grease that was not applicable to this actuator; the grease is intended for the plain-screw actuators.

1702323549711.png

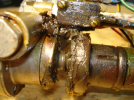
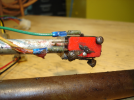
The microswitch was full of it. That round collar below the switch is the recirculating-ball nut. The balls run in semicircular grooves in the screw.

Even the electrical connectors were greasy.

1702323695799.png

Even the down-limit switch had grease on and in it, carried there by the travelling nut.

1702323766022.png

It took a long time to get the grease out of everything, especially that ball nut. Replaced connectors, and I think I may have used new switches, too, to be safe. Hard to get all that stuff out of them.

1702323879430.png

Now, if the mechanics had taken the ten minutes to read the section on jackscrew lubricating, this owner wouldn't have had to pay for a lot of shop time to correct it all.
 
I see you installed aviation grade electrical connectors also.
Nice work.
I learned a few years ago probably from you not to spray that jack screw so not to soak those limit switches
 
Last edited:
My bad for being lazy and asking instead looking in the service manual. I found 3 pages that specify what lube where. Thanks for the smack on the back of my head.Was concerned about the dirt and grit in those rudder pedals IMG_3679.jpegIMG_3678.jpeg
 
In order to comply with the early ‘70s AD on the Actuator it had to be

removed from the aircraft and the jackscrew and ball nut cleaned

thoroughly with solvent. This was at every Annual IIRC. Then the moly

grease was applied and the assy reinstalled. Circa 1973 snubber was added

and the requirement dropped. This addition also made the r & r much more

tedious.

My guess is a lot of aircraft still have the moly grease and there is confusion

as to the type of lube. I believe the unit should be removed and cleaned

before changing the type of lubricant.

Those folks that do Owner Assist would be wise to invest the lube tasks

they are permitted to do as PM. Rudder pedals and linkage, flap rollers

Starter Bendix are possibilities . If it’s worth doing it’s worth doing right.
 
And of course those 40 year old brake hoses are stiffer than a dead man.
WTH where and when do you stop with these old aircraft?
I did purg all the old 5606 out with new a couple years ago.
They’re not leaking…yet.
I can’t replace them now, I got to fly this weekend with my CFII.
I’ll put them on the list for down the road I hope.
 
My guess is a lot of aircraft still have the moly grease and there is confusion

as to the type of lube. I believe the unit should be removed and cleaned

before changing the type of lubricant.
Chapter 2 of the '69-'76 Cessna manual deals extensively with the cleaning and lubrication of the three different actuator types. There are actuators defined by the airframe serial number, and those identified by the SB modifications. The chapter on flaps (7) has pictures of the three types.
 
I had a Cessna 150 with manual flaps when I was in school, I R&R every bellcrank in the airplane, cleaned and greased all the needle bearings in them, R&R every pully in it and cleaned and oiled every bearing in them, still had to replace about 5 pulleys. Replaced every flight control cable in it, replaced all the flap rollers with the new McFarlane kit with the SB washers, R&R the pitch trim jack. The flap handle moved so much easier it was amazing. We also overhauled the engine in this bird.

We sold it several years later and under its new ownership several years after it suffered a ramp mishap when another airplane was towed into it. It ended up in Greely CO totaled and scrapped.
 
Last edited:
I used this to lube the rudder bar ends and linkage point pivots with 30 W oil. Was able to do the pivot tube on the back of the rudder peddles with it pretty accurately. Not so tough to do with the long small tube. The peddles still feel pretty tight on the tube so I am glad I got some oil in there.Should be done every 1000 hours.
IMG_3684.jpeg
 
IMG_3692.HEIC

A very experienced A&P helped me on this. Got some very nice chunks of tungsten to buck the rivets with.
Going to smooth out that crack on the flange and got a reinforcement strip to go in there that supports the cable mount..
(edited)_IMG_3693.png

Show stopper. We found this baffle material too worn/cracked to go back in. Should have known, was hoping to get it back together today. Not sure on the replacement yet. I have talked to Acorn Welding this afternoon...
(edited)_IMG_3704.png
 
Last edited:
While you're there check out the Dynamic Propellor carb heat cable sleeve mod. Bottom of this page: http://www.dynamicpropeller.com/cessna-172--182-airbox-products.html

And Gary, you're missing out on a lot of type specific maintenance info if you're not checking out the Cessna Pilots Society forums. They're heavy on 182s and 210s there but it crosses over to 172s often and we've got 172 guys & gals participating.
Thank you. I will check it out/
I installed the McFarlane carb heat cable a couple years ago. It is smooth and protects the end of the cable in a similar way I think?
 
1702683926977.png

Those two rivets are not AD aluminum rivets. IIRC, they're Monel. Maybe the shaft and bearing kit has them?
 
View attachment 123279

Those two rivets are not AD aluminum rivets. IIRC, they're Monel. Maybe the shaft and bearing kit has them?
Good point and exactly what Jim pointed out this morning. McFarlane included 3 new ones that came with the shaft and new shaft bearings. They can be seen in the blurry background of one of the above pictures. Monel=steel rivets, right? I drilled them out this morning.
I brought it back to my shop and will re assembly when I get the air door squared away.
 
Back
Top